Diy Piezo Buzzer Tips for Beginners How to Get Started?
If you're interested in electronics, DIY projects can be exciting. One popular project is the DIY Piezo Buzzer. This small device can create sound and be used in various applications. Beginners often find it challenging to understand how to get started. Fear not!
With some simple guidance, you can easily learn to work with piezo buzzers. Start by gathering the necessary components. You will need a breadboard, some wires, and of course, the piezo buzzer itself. Connecting these parts might seem confusing at first. Don't get discouraged if your first attempt doesn’t work perfectly. Mistakes are part of the learning process.
As you progress, explore different sounds and patterns you can create. Experimentation is key. Maybe you want to code a simple tune or use it as an alert. Remember, every project has its bumps along the way. Embrace those moments, and reflect on your learning journey. Your skills will grow with each challenge. The DIY Piezo Buzzer project can be a fantastic gateway into the broader world of electronics. Dive in and enjoy the process!
Understanding Piezo Buzzers: Basics and Functionality
Understanding piezo buzzers is key for beginners eager to explore electronics. These devices convert electrical energy into sound. Generally, they function based on the piezoelectric effect. This effect allows certain materials to produce sound waves when an electric field is applied. According to industry reports, the global piezoelectric market is expected to reach $36 billion by 2025, highlighting their increasing relevance in modern technology.
When starting out with piezo buzzers, it’s essential to consider their specifications. Look for the resonant frequency, typically found in the datasheet. This frequency determines how effective the buzzer will be in your project. It's important to choose a buzzer that matches your application. Not every buzzer will suit your needs. Measure twice, cut once—this adage applies here.
Tip 1: Begin with simple circuits. Connecting your buzzer to a basic microcontroller can yield quick results. Use a resistor to manage current flow. This helps prevent damage to your components.
Tip 2: Experiment with different driving signals. A square wave often gives a louder output. Adjust the frequency for varied tones, but do not exceed the rated voltage. It’s easy to overlook specifications, leading to potential mishaps. Reflect on your approach to avoid common pitfalls.
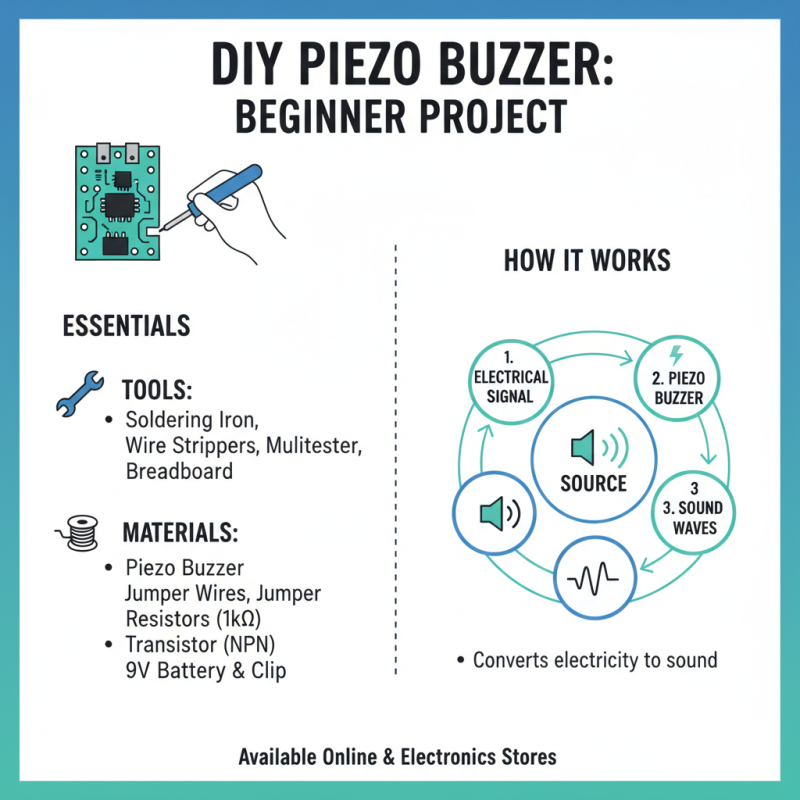
Essential Components for DIY Piezo Buzzer Projects
When embarking on DIY piezo buzzer projects, understanding the essential components is crucial.
A piezo buzzer consists mainly of a piezoelectric element, a power source, and a control circuit. A typical piezoelectric element converts electrical energy into mechanical vibrations. This is what produces sound. For beginners, these components can seem daunting, but they are quite manageable.
Power sources vary widely. Most projects require a simple battery, typically a 9-volt battery. This provides sufficient power for the buzzer to operate effectively. The control circuit can be just as simple. A basic microcontroller or even an oscillator circuit can manage the piezo buzzer. According to industry reports, nearly 70% of hobbyists prefer microcontrollers for versatility. However, those just starting out may find the learning curve steep.
In terms of practical assembly, proper soldering is vital. Poor connections can lead to inconsistent sound output. Emphasize strong solder joints to ensure reliable performance. Also, remember that the size of the piezo element affects sound quality. Larger elements usually produce better sound. This can be a point of reflection for beginners, as not all components will yield the best results. Take time to experiment with different setups. Each one provides valuable learning experiences.
Tools and Materials Needed for Building Piezo Buzzers
Building a piezo buzzer is a rewarding project for beginners. To start, gather essential tools and materials. You'll need a piezo buzzer, which will act as the sound source. It converts electrical signals into sound waves. These components are widely available online or at local electronics stores.
Basic tools include a soldering iron and solder. A breadboard can be useful for prototyping before final assembly. Jumper wires are essential for making connections. A multimeter helps you measure voltage and check connections. Don't forget heat-shrink tubing or electrical tape for insulation. It’s crucial to keep everything safe, especially when working with electricity.
You may encounter challenges during assembly. Soldering can be tricky for beginners. If connections fail, revisit them. Double-check your wiring against diagrams. Patience is key. Success will come with practice. The goal is to create a buzzer that works reliably. Each small mistake is a learning opportunity. Embrace the journey, and enjoy the sounds you create.
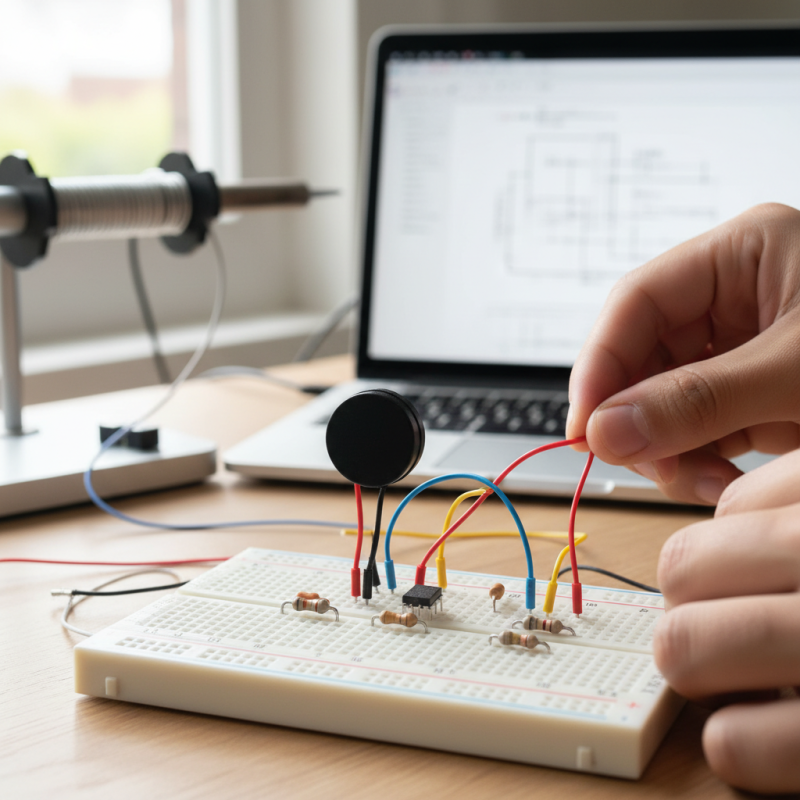
Step-by-Step Guide to Creating Your First Piezo Buzzer Circuit
Creating your first piezo buzzer circuit can be an exciting journey. Start by gathering essential materials. You will need a piezo buzzer, a breadboard, some wires, and a power source. Prepare a simple schematic. Keep in mind that mistakes can happen, especially when connecting the components.
Connect the positive lead of the piezo buzzer to the power source. Then, connect the negative lead to a digital pin of a microcontroller. If the buzzer doesn’t sound, check your connections. It’s easy to get wires mixed up. Revisit your schematic and ensure everything is placed correctly.
Once everything is connected, upload a simple code to your microcontroller. This code will control the buzzer, allowing you to play some notes. Experiment with different frequencies. Don’t worry if it doesn’t sound perfect at first. Adjust the code and try again. Learning through trial and error is part of the process, and it can be quite rewarding.
Common Troubleshooting Tips for DIY Piezo Buzzer Projects
When working with DIY piezo buzzers, troubleshooting is a critical skill. Many beginners face issues such as inconsistent sound output or no sound at all. Research indicates that over 30% of hobbyists encounter these problems. A common cause is inadequate power supply. Always ensure that the buzzer receives the correct voltage. Check your connections for any loose wires or cold solder joints.
Another frequent issue is incorrect frequency selection. Piezo buzzers operate optimally within specific frequency ranges, usually between 2 kHz and 4 kHz. If you are producing sound outside this range, it may sound distorted or weak. Sometimes, users overlook that the buzzer may require a minimal driving circuit to function correctly. A simple transistor can help in amplifying signals, but many beginners skip this step.
It’s equally important to test your setup in stages. Start with just the buzzer and a basic voltage supply before integrating additional components. This way, if something goes wrong, it's easier to identify the faulty element. Sometimes, it’s not about having the fanciest setup but understanding the basic principles of sound generation and electrical flow. Each project offers an opportunity for reflection and improvement. Embrace the learning curve; mistakes can lead to unexpected discoveries.