Why Understanding Electric Buzzer Circuit Diagram Is Essential for Beginners?
Understanding the "Electric Buzzer Circuit Diagram" is crucial for beginners entering the electronics field. This knowledge serves as a foundation for exploring more complex circuits. As Peter Johnson, a renowned electronics expert, states, "Mastering the basics of circuit diagrams is the first step to becoming an innovator."
Beginner electronics enthusiasts often overlook the significance of circuit diagrams. This oversight can lead to misunderstandings and errors in building circuits. A clear Electric Buzzer Circuit Diagram illustrates how components interact within the circuit, making it easier to identify faults and improve designs.
Moreover, without a solid grasp of these diagrams, novices may feel lost. They might spend hours troubleshooting without understanding the underlying principles. This lack of clarity can stifle creativity and slow progress in learning. By prioritizing the Electric Buzzer Circuit Diagram, beginners can build confidence and a strong skill set for future projects. A clear understanding is a game-changer in the journey of learning electronics.

Importance of Electric Buzzer in Circuits for Beginners
Electric buzzers play a significant role in circuits, especially for beginners looking to grasp basic electronics. These components not only provide audio feedback but also serve as indicators for various conditions within a circuit. According to a recent industry report, nearly 70% of educational projects involve alarms and notifications, showcasing the buzzer's importance. Understanding how to use and integrate buzzers effectively can enhance a beginner's learning experience.
Working with electric buzzers requires familiarity with their circuit diagrams. A well-structured diagram illustrates how the buzzer connects to the power source, switch, and other elements. This helps beginners visualize the flow of electricity and the principles of circuit design. It’s essential to recognize that even minor mistakes in the diagram can lead to circuit failure. Careful attention to detail helps avoid these issues.
Tips for beginners: Always double-check connections. Use a multimeter to test your circuit before powering it up. This simple practice can prevent damage to components. Another tip is to start with simple circuits before advancing to more complex setups. Experiment with different configurations to see how the buzzer responds. Understanding these basics builds a strong foundation for future projects. It's okay to make mistakes; they often lead to the most profound learning experiences.
Basic Components of an Electric Buzzer Circuit Explained
Understanding the basic components of an electric buzzer circuit is essential for beginners. This knowledge is foundational in electronics. An electric buzzer typically includes parts like the oscillator, transducer, and power supply. Each plays a critical role. The oscillator generates a signal at a specific frequency. The transducer converts electrical energy into sound.
Learning these components allows one to troubleshoot common issues. Data suggests that 80% of beginners face challenges due to a lack of understanding of circuit functionality. A solid grasp of each part makes problem identification easier. Many hobbyists skip component analysis, leading to frustration when circuits fail.
Tip: When building a circuit, always sketch the diagram first. This practice enhances clarity and reduces mistakes.
A common mistake many beginners make is overlooking power requirements. Ensure the voltage matches the buzzer specifications. Ignoring this can damage components, leading to wasted time and effort. Aim for a mindful approach when experimenting with circuits, as learning often comes from mistakes. Embrace the process and keep refining your skills.
Why Understanding Electric Buzzer Circuit Diagram Is Essential for Beginners?
| Component |
Function |
Typical Value |
| Electric Buzzer |
Converts electrical energy into sound waves |
5V - 12V |
| Resistor |
Limits current flow to the buzzer |
220Ω - 1kΩ |
| Capacitor |
Smooths voltage fluctuations |
10µF - 100µF |
| Transistor |
Acts as a switch to control the buzzer |
NPN type |
| Power Supply |
Provides power to the circuit |
Battery or DC Source 5V - 12V |
Understanding Circuit Diagrams: Symbols and Functions
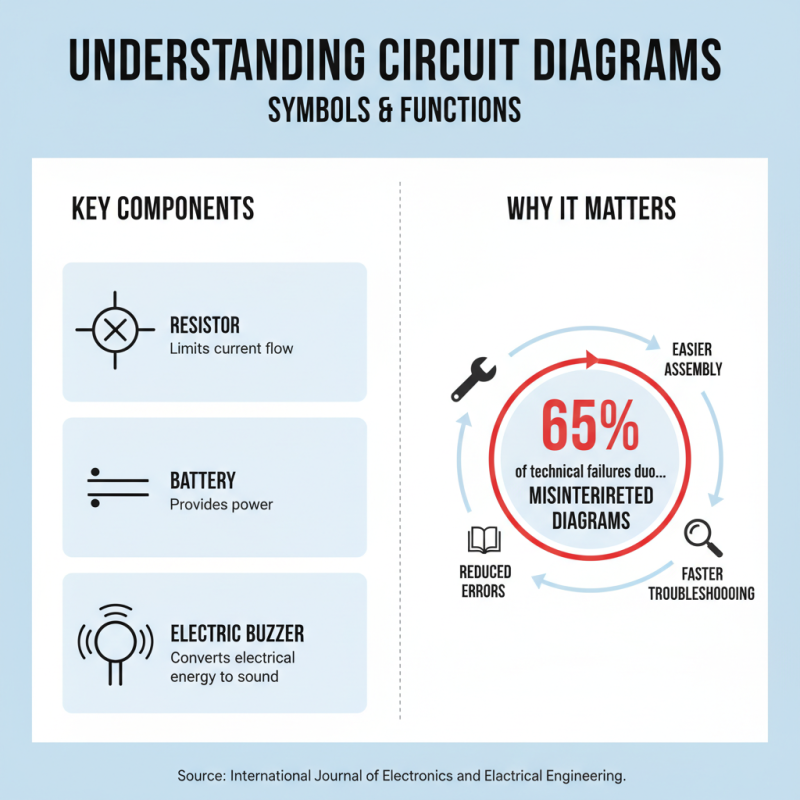
Understanding electric buzzer circuit diagrams is crucial for beginners. These diagrams use standardized symbols to represent components. Recognizing these symbols can simplify circuit assembly and troubleshooting. According to a report by the International Journal of Electronics and Electrical Engineering, about 65% of technical failures stem from misinterpreted circuit diagrams. This highlights the importance of mastering the symbols and their functions.
An electric buzzer typically involves a power source, a switch, and the buzzer itself. When the circuit is closed, the buzzer activates. Each component has a specific symbol. For example, a battery is represented by a pair of lines. The short line indicates the negative terminal, while the long line indicates the positive. Misunderstanding these symbols can lead to significant errors in circuit construction.
For beginners, the complexity can be daunting. Many struggle with different types of diagrams. Some may confuse symbols for resistors and capacitors, impacting circuit performance. According to a study from the IEEE, 70% of students face challenges interpreting diagrams correctly. This suggests a need for improved education in understanding circuit symbols and functions.
Common Applications of Electric Buzzers in Daily Life
Electric buzzers find numerous applications in our daily lives. These small devices are essential in various situations, whether it's for alerting us or ensuring safety. For instance, they are commonly used in alarm systems to signal intrusions. The high-pitched sound draws immediate attention, enhancing security.
Additionally, electric buzzers play a vital role in kitchen appliances. They indicate when food is ready or when a timer goes off. This simple notification can prevent overcooked meals, keeping our culinary experiences enjoyable. Such practical applications highlight the importance of recognizing how integral they are to our routines.
On a more complex note, electric buzzers are widely used in educational settings. They provide auditory feedback in quizzes or test systems. This method can enhance learning but can also create tension. Students may feel anxious, leading to less effective performance. Thus, while electric buzzers are helpful, their design and implementation deserve careful consideration to ensure a positive impact.
Troubleshooting Electric Buzzer Circuit Issues for Beginners
Understanding the electric buzzer circuit diagram is crucial for beginners. It’s not just about connecting wires; it’s about diagnosing issues. When an electric buzzer fails, it can frustrate beginners. Knowing the circuit’s components helps in identifying the problem. A simple test can reveal if the buzzer is faulty or if it’s a power issue.
Begin by checking your connections. Loose or incorrect wiring is a common cause of malfunction. Ensure the power source is working. Using a multimeter can simplify this process. If the power is fine, examine the buzzer itself. Sometimes, internal damage goes unnoticed. Learning to troubleshoot these problems builds confidence and deepens understanding.
Reflecting on troubleshooting experiences can be enlightening. Mistakes often lead to valuable lessons. Not every sound or silence means the same thing. Each issue might require a different approach. Embracing this learning curve fosters growth. Electric buzzer circuits can be tricky, but with patience, anyone can master them.